Ikea Billy Bookcase Hack: Living Room Built-Ins
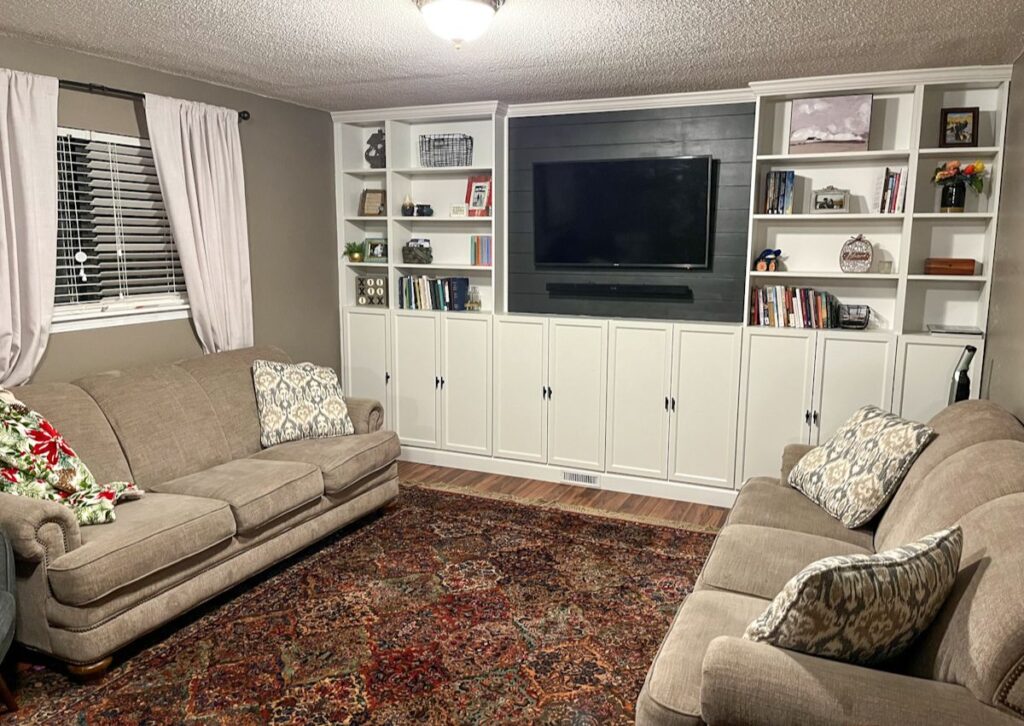
This guide will answer all your questions on how to build Ikea Billy bookcase built-ins. Built-ins can completely transform a room for the better. They are beautiful, add storage, and are very functional. We broke the process down into step-by-step instructions and materials needed for the “Ikea Billy Bookcase Hack: Living Room Built-Ins”.
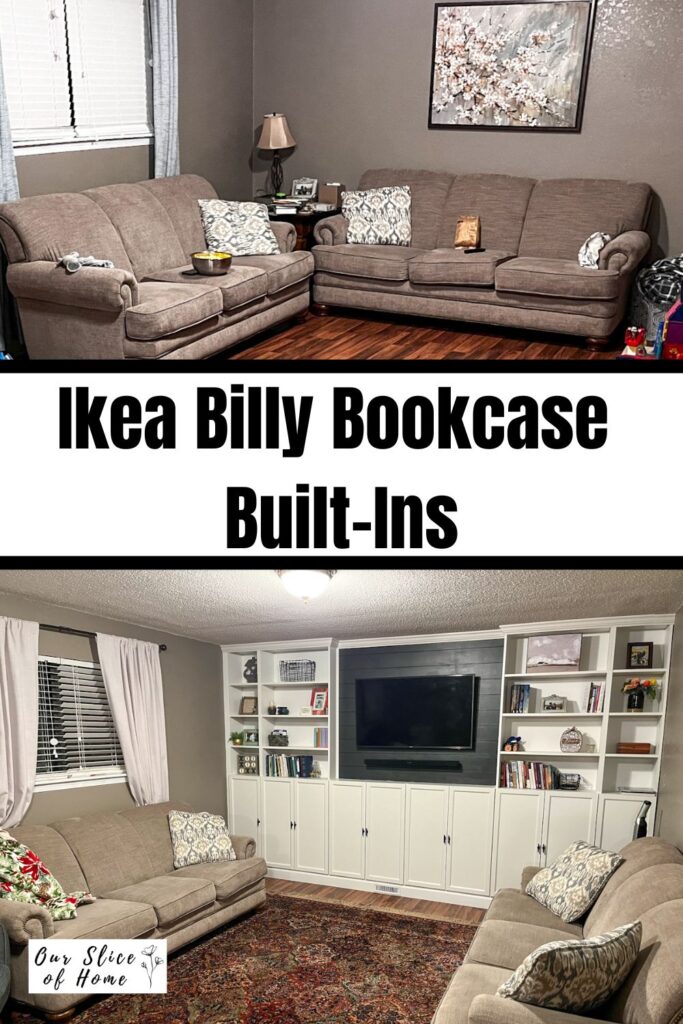
Ikea Billy Bookcase Hack: Living Room Built-Ins
“Honey, have you seen where people take the Ikea bookcases and make built-ins?” This was the question to my husband that started the whole project.
Reasons I wanted to do the Ikea Billy bookcase Hack: living room built-ins:
- More storage: the cabinets store toys, children’s books, DVDs, puzzles, and board games. The upper bookshelves display books, seasonal decor, and pictures.
- A beautiful, yet functional space
- More affordable: custom built-ins come with a huge price tag. You can tailor to this project to your budget needs.
Ikea Billy bookcase hack materials
Half bookcases if needed for your space
Ikea Bookcase extenders (If you need a taller height to reach the ceiling. You will need to measure your own space.)
Ikea OXBERG Cabinet doors: If you are wanting to enclose any of the shelves
Wood and trim needed
- 2x4s: to provide a platform for the bookcases
- 1×2 white trim: for filling a gap between the bookcase and the wall
- ¼ white quarter round: for the corners between the bookcases and the shiplap
- Crown molding: This was a personal preference that I wanted at the top of the built-ins
- Baseboard trim
- If you are doing a shiplap wall:
- 2x4s to frame out the shiplap wall (omit if you are not doing a shiplap wall)
- Shiplap (for behind the TV if you choose to do this. If you are only doing bookcases across, you will not need shiplap)
Outlet materials needed
- Electrical outlet box(es)
- Electrical outlet(s)
- Outlet cover(s)
- Outlet spacers (Like these from Amazon. use these to space the outlet away from the box/wall a bit to allow the outlet to come through into the bookcases.)
Other materials needed
- Approximately 6-8 feet of Romex wiring
- 18 gauge finish nails
- Various screws
- Wood putty
- Primer
- Paint
- Paintable white caulk
Possible materials needed
- 18 gauge Finish Nail Gun (if pneumatic, you need an air compressor)
- Pencil
- Drill
- Utility knife
- Impact driver
- Tape Measure
- Philips screwdriver
- Stud finder
- Level
- Miter/chop saw: to cut the 2x4s, trim, and crown molding
- Caulk gun: to fill in the extra holes on the side of bookcase. These holes allow you to move shelves up and down and we preferred to fill them in to have cleaner look.
- Paint supplies: Rollers, brushes, pans, tarps, tape.
- Air vent redirect and air vent: If you have an air vent where you are trying to place the shelves
How to make Ikea Billy Bookcases look “built-in”
Preparation
- Check the wall you are using for electrical outlets, switches, plumbing or ac vents. (This will help you know where you will need to cut holes in the back of your bookcases to put the plates in.)
- Measure the wall to determine how many bookshelves you will need.
- You can use half-width bookshelves on the sides if it is an odd number.
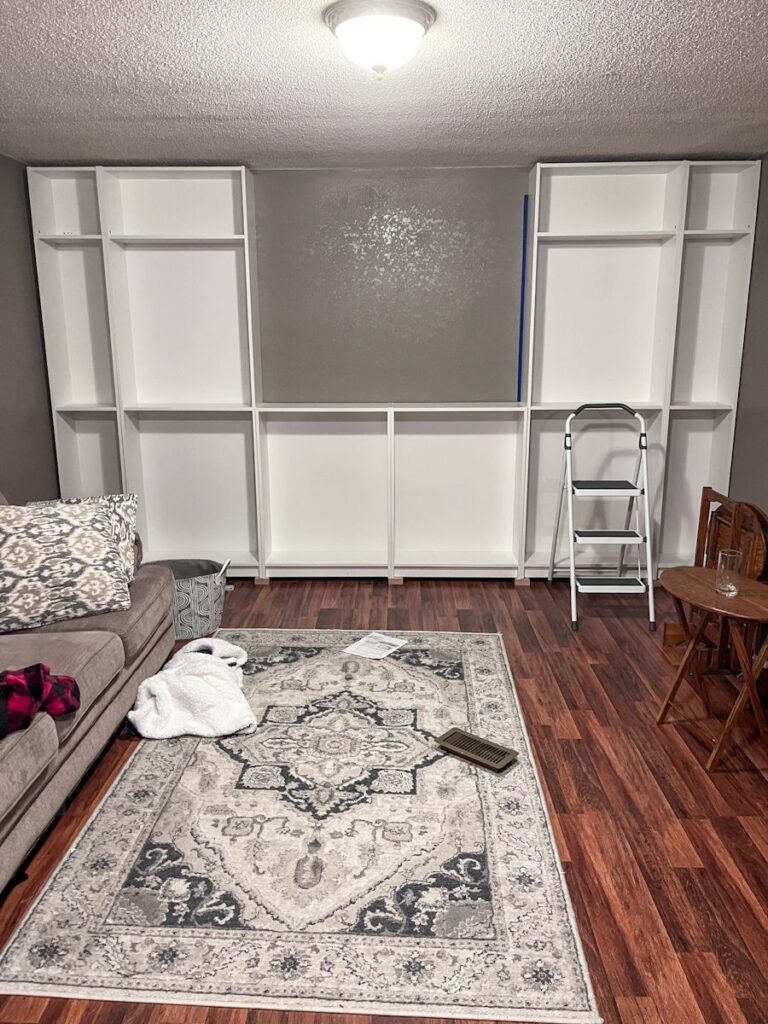
- For our space we did a half and full Billy bookcase on each side. Then two 41 inch tall, full Billy bookcases in the middle.
- If you want your bookcases to reach the ceiling, and complete the built-in look, use Billy bookcase height extensions to go to the ceiling.
Removing baseboards and outlet covers
- Remove baseboard trim on the main wall and side walls. I saved min to reinstall at the end.
- Remove the outlet plates now for any outlets. I chose to reinstall those plates after cutting holes for the outlets in the back of the bookcases.
Creating a platform and test fit the bookcases
- I needed to raise the bookshelves up 2 inches to have the baseboard fit on the front (and allow the cabinet doors to open). I put a 2×4 along the wall and under each side of the bookshelves feet. I measured and constructed it in the garage and then brought it in and saw if it fit. I then had to adjust for the air vent.
- At this point I put the bookcases in place to see how they fit. (I had to move the 2×4 platform once or twice to get it sitting on there just right.)
- Once I was confident that the bookcases would sit on there nicely, I screwed the 2×4 platform into the floor with 3.5 inch screws and my impact driver.
Cutting the bookcases to allow outlets, ethernet, and hdmi cords to go through. You can omit many of these steps if you aren’t using the built-ins for media purposes.
- While testing the bookcase fit, I marked where the outlets were and cut holes in the bookcases (IMPORTANT NOTE: It is illegal to cover up outlets so please do not skip this step and leave outlets just covered by your bookshelves even if you do not want to use them).
- Next I made a square hole for a media slot for Ethernet and hdmi to run through.
- Measure twice, cut once.
- I used a combination of a drywall saw and a utility knife to cut them.
- I also wanted to run electricity from an outlet in the cabinets, up for an outlet for the tv. I cut a skinny, long hole in the drywall from the lower outlet to above where the bookcase was (make sure there are no other electrical or plumbing in the wall before cutting the drywall). That way as I ran the romex I could attach it on the outlet below, install the bookcase, and then worry about putting in the box for the tv outlet at a later stage of the project.
- This is also a good time to run any cords you will want to run into the cabinets alongside the power in the wall. I ran Ethernet and a few hdmi cords. I included one extra hdmi cord than I currently use in case I want to add something later or I upgrade the TV and will use more inputs.
- This was a nerve-racking part for me. Of course I turned off the electricity to attach the romex to the outlet but after I ran it up, I needed to turn the electricity back on to use our house. Since I had it hanging out up there for an about a week or two, I covered the end of the romex in electrical tape and secured it to the wall above the bookshelves with tape so it was out of the way.
Installing the bookcases
- I used 3.5 inch screws to attach the wooden upper extensions into studs at the top (these attach to the top of the bookcases and I figured that would be good enough). You can find the studs with a stud finder before you put up the shelves or just use a nail and if it goes in easy with a hammer there is no stud. This puts holes you have to putty later, but it works.
- I also used L brackets (that came with the bookcases from Ikea) to attach the top of the 41 inch bookcases in the middle and L brackets along the feet of the bookcases to the 2x4s so they are attached at both top and bottom.
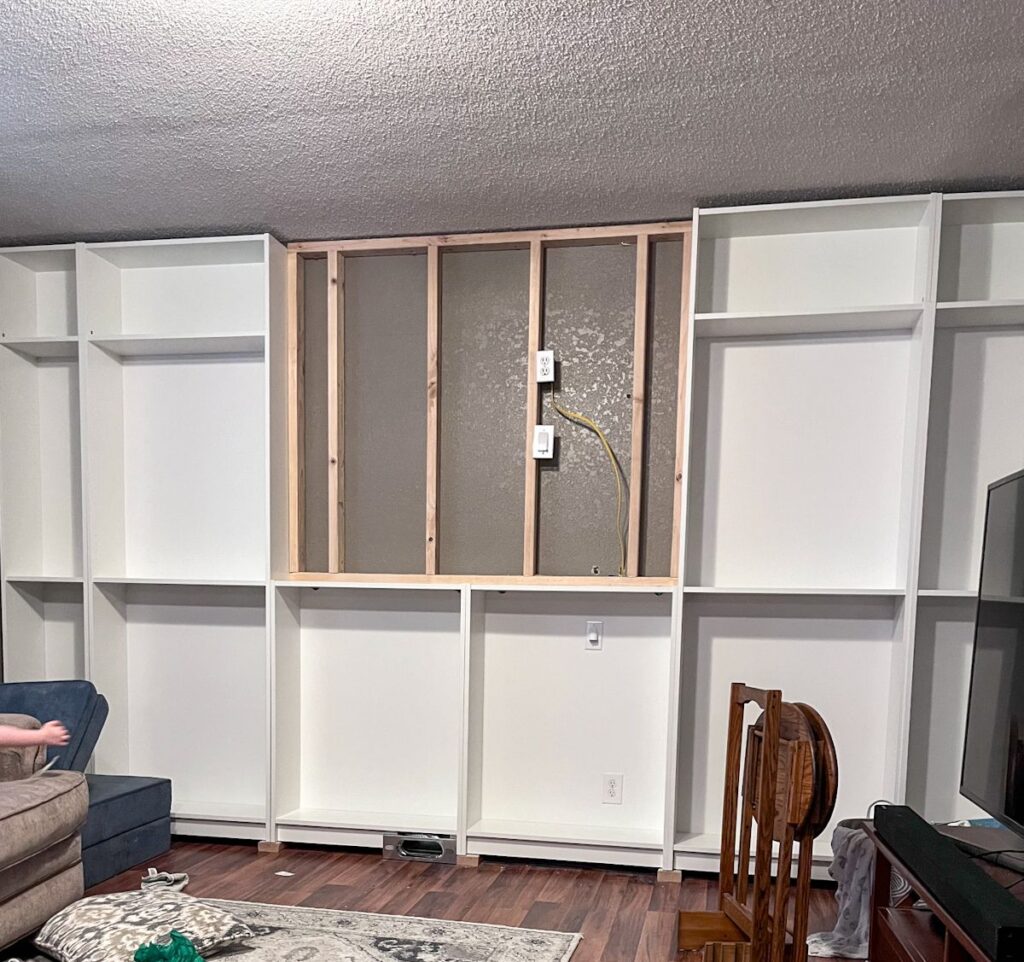
Installing the shiplap wall and mounting the TV. You may omit many of these steps if you are not doing a shiplap area and installing a TV.
- We chose to go with a 2×4 frame and attach it to studs on top of the drywall. So I measured the space above and between the bookshelves and built it like a typical wall, 16 inch off center but I offset them from the middle to make the mounting of the TV easier to be centered. I built the square with just the 4 outside boards, test fit it, and then filled in the other 16 inch spaced boards.
- I cut holes in the 2x4s to be able to put the romex and other cables through. Then I installed the outlet box to the right of a stud on the right side, above where tv mount would go.
- I used a stud finder to find the studs in the wall.
- Then I installed the 2×4 wall onto the existing wall with 3.5 inch screws into the top and bottom boards at an angle where the studs were.
- Then I cut and installed the shiplap starting from the bottom since the top would be covered by trim. I used a 18 gauge nail gun and an air compressor to make this quick work. (If you are new with a nail gun like I was, get a scrap piece of shiplap and a 2×4 and test the PSI on your compressor and depth setting on your nail gun to get the nails to sink deep enough but not too deep. If they are deep then the wood filler can create little pits or bulge out depending on temperature. If they aren’t deep enough you will spend time pulling them and trying again or using a hammer and a nail punch.
- As you go you will cut out holes for the outlet boxes and stop to cut a hole for a sound bar to run power and an optical sound cable (I know some sound bars connect wirelessly now, but you will still have to run power).
- I also planned for an outlet box (that I cut big holes in) for the media port to go underneath the tv mount so when installing the shiplap I had to stop to cut a hole or holes for that and the outlet.
- I got mounting brackets for my sound bar and measured and installed those underneath the tv. (I wanted it about 2/3 of the distance from the bottom of the tv and the top of the bookcases.)
- Then I drilled a hole in the middle that I could fit the power cable and sound cable from the soundbar to run into the wall and then through the media port behind the tv. Power went to the outlet and the sound went to the tv itself.
- I installed the tv mount and tested everything. I put the tv up there and everything. Then I took it down again.
- Next, I used wood filler to fill the holes. I also did this on the bookshelves that were going to be exposed on either side. Later I would sand and paint both.
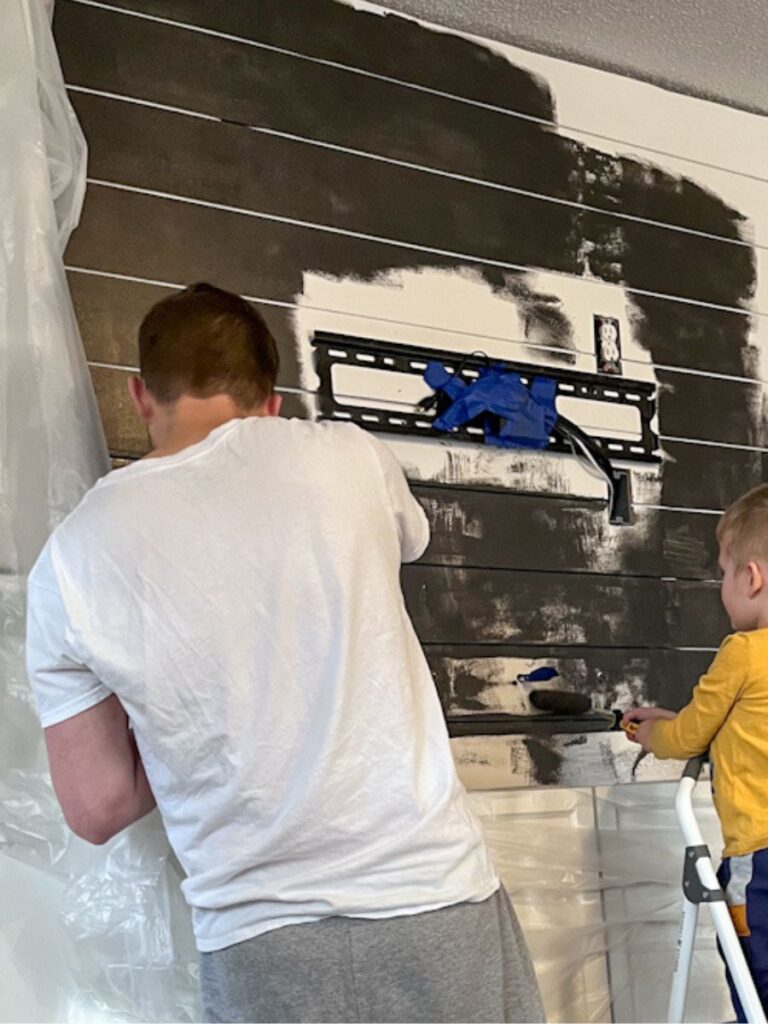
Painting the shiplap
- Fill in the holes with wood filler and then sand them.
- Paint the shiplap. The color we used was Iron Ore by Sherwin Williams.
Installing crown molding at the top of the bookcases
- Crown molding allows the top of the bookcases to seamlessly attach to the ceiling. I personally think it greatly improves the look.
- We attached some other trim to cover some gaps.
- I put in a difficult-to-cut white 1×2 trim piece on the side of the bookcases next to the wall that had a large 2 inch gap.
- Next we put in white quarter round for the sides of the shiplap. (Be careful installing the quarter round with the nail gun, MAKE SURE YOU POINT THE NAILS TOWARDS THE WALL, I forgot and had some nails poke out into the bookcase which I had to clip and fill and paint…)
- Then final touches will be putting any white silicone between the shiplap and the bookcase or along any trim pieces that need it.
Install the baseboards
- You can either reinstall the baseboards you previously pulled off or get new ones.
- I used the nail gun to install them.
- Remember to cut out a space for an air vent if you have one. Use wood filler for nail holes.
Install the bookcase shelves.
Install the shelves at any height you’d like.
Install the cabinet doors
- The instructions for installation are included in the Ikea box.
- We swapped out the handle hardware for from black handles at Lowe’s that we liked better.
FAQ
“Ikea Billy Bookcase Hack: Living Room Built-Ins”.
My family has loved our “Ikea Billy Bookcase Hack: Living Room Built-Ins.” Let me know in the comments if you plan to do an Ikea Billy bookcase hack project! The opportunities are endless.

